How Do I Post A Blog?
Use 97 Display's CRM to post blogs on your website to add new & relevant copy to your website.
1. On the blue menu bar, click “Website Manager” (laptop screen icon) and click "Post a Blog."
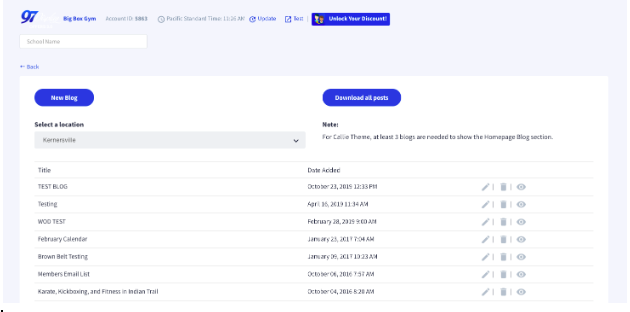
2. Once on the blog page, you will see all of your past blogs and two blue buttons at the top. You can click “Download All Posts” to download all past blogs in a .csv file. To create a new blog post, click the “New Blog” button.

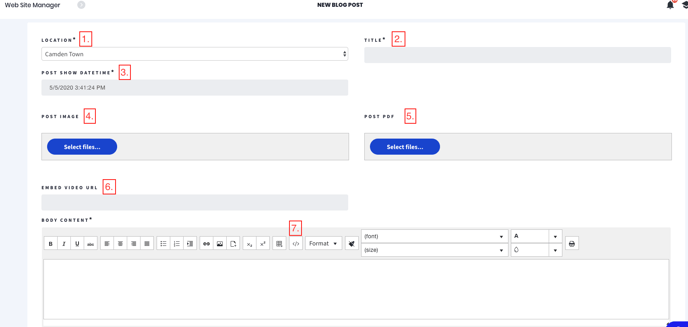
3. Complete all necessary fields:


- Location: If you are a multi-location business, choose which location you would like this blog to post to.
- Title: Name your blog post.
- Post Date: This will automatically be set to the current day and time. With this feature, you can schedule your blog to post on a future day/time.
- Post Image: Choose an image that goes along with your blog post. Image will be shown as a thumbnail on the website.
- Post PDF (optional): Choose a pdf that goes along with your blog post. PDF will show in the body of the blog post.
- Embed Video URL (optional): If you would like a video embedded on your blog, you can copy/paste the embed URL in the blank or you can copy/paste the embed code within the HTML box (see step 7)!
- Body Content: Click into the Body Content text box to start writing and stylizing your post. If you want to paste your content from another document into the text box, make sure you click the "View HTML" button (</> button) and paste into the HTML box. This will fix any formatting issues.
- Click "Save."